 This will be a 3 part series about Brag Tags, or as I like to call them, Braggin’ Badges. They are a great classroom management strategy for encouraging positive behaviors in the classroom. This first post will be about getting them ready before the school year starts. The second post will include tips about storage and organization of Brag Tags. The final post will be about how I use them in my classroom with tips for you about what I found to work. I’ve used Brag Tags for three years now and I LOVE them! The kids enjoy collecting them and adding them to their chains that I have them store in the classroom.
So, Brag Tags came to be in my classroom because they were a school-wide initiative and the administration would buy some that they gave out once a quarter at the awards assembly. Well, the kids seemed to enjoy them SO much that I decided to start making my own so that I could reward their efforts and accomplishments in the classroom more than just 4 times a year!
First, I printed out all of my tags that I wanted to use. I suggest starting with the main ones you’d like to focus on because, I’m not going to lie, they are a lot of work to prep but SO worth it. Plus, if you do it over the summer, you’re pretty much set for the year. Definitely worth the time so DO try to fit it in.
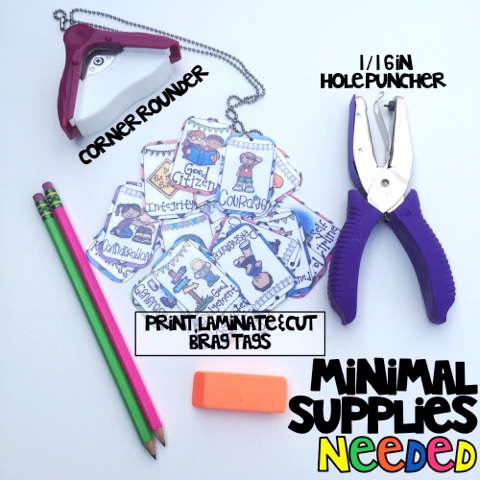
What You Need:
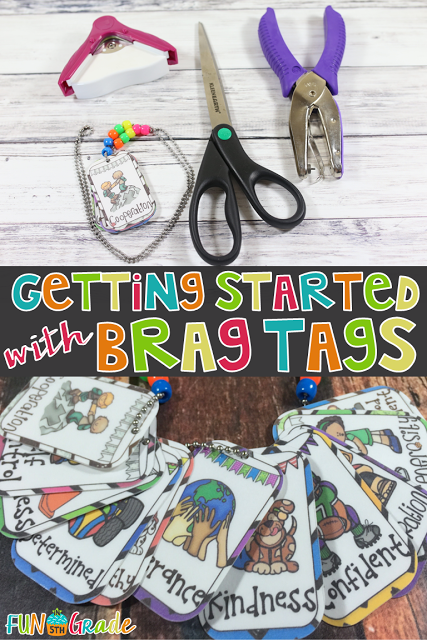
- DO use card stock: I like to print on card stock so that the tags are more sturdy. I get my card stock on Amazon and it is 90 lbs and always under $10 for 250 sheets!
- DO NOT use copy paper: Well, you could if students will not really be wearing them. But if students are going to be wearing them, card stock is the way to go!
- DO use lamination (I have this laminator): Kids WILL destroy all of your hard work. LOVE having my own laminator. If you don’t have one, you should definitely check them out. I think they are fairly cheap, considering what the schools probably pay for theirs. Bonus: The lamination is SO much thicker and makes things so much more sturdy. Perfect for resources the kids touch like task cards, card games, and brag tags.
- DO NOT use the school laminator: Again, you could, but if students are wearing them the lamination sheets are the way to go.
- DO find a pair of good, comfortable scissors: It’s a lot of cutting!
- DO NOT use a random pair of kids scissors: It is a lot of cutting. Have I mentioned you must cut them out.
- DO buy a corner rounder: Well, you don’t HAVE to, but I strongly recommend it! The corners can be a little sharp after cutting so rounding makes them much smoother but also, I just like the way it looks!
- DO NOT round the corners with scissors: That would take FOREVER, but you could do it if you felt the need.
- DO buy 1/16″ hole puncher (approx $7): You could use a regular hole punch but it would punch out a big chunk of your cute little tag. I got the 1/8″ and though that was still too big but that’s just me.
- DO get something for the kids to keep them safe: There are so many options here but the possibilities really are endless. I’ve seen them put on long chains, key chains, metal rings, and even glued into a collection book, (I used the chains but that’s mostly because the school gave them to me.)
- DO NOT let them take them home: Well, my students couldn’t take them home. The first year I did Brag Tags, I did let them take them home and then they ended up losing them, which resulted in them not caring about earning the tags. But you should definitely use your own judgement depending on your class
I spent a total of about $30 getting this started in my classroom and then much less now that I have the supplies. Also, take note, that I already owned my own laminator. Now, it’s about $10 for supplies and ink and such to restock my tags. Totally worth it!
What’s Next?
- DO print out all of the tags you’d like. My tags are made so that each type has a full page so you can print only the ones you’d like.
- DO NOT cut them out yet. You really don’t want to cut them twice!
- DO laminate them. Keeps them super sturdy for the students.
- DO NOT eat the lamination. Just kidding. I just didn’t have a “do not” for this one.
- DO get your comfy scissors and cut them out. I do one tag type at a time and stack them separately.
- DO NOT mix them all up. That would be such a pain if you plan on organizing them in some way later.
- DO use your handy dandy corner rounder to trim the corners. Makes them look SO nice.
- DO NOT use your corner rounder to trim your cat’s hair. 😉
HOORAY! You’re done with the hard part. I know, your hand hurts, but you did it! Now, you get to encourage your students in a super fun way. Woot!
Stay tuned for my next post about how I organize them both before school and then in the classroom!
Need Brag Tags? Click here for a FREEBIE.
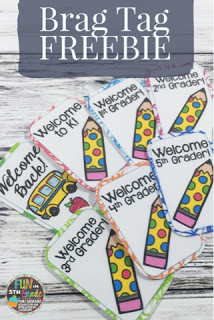 Here’s a freebie for you to get started.
Check out my Teachers Pay Teachers store for even more different types of Brag Tags (click here to see them) that I have made to make things easier for you. I have them available in the following categories:

<div id=”fd-form-636bb193316eddf086f06de4″></div>
<script>
window.fd(‘form’, {
formId: ‘636bb193316eddf086f06de4’,
containerEl: ‘#fd-form-636bb193316eddf086f06de4’
});
</script>