
 Everywhere you look, new digital resources are springing up. Sometimes you don’t need new resources. You just need to give your old resources a digital sprucing up. Use this step-by-step guide to learn how to digitize worksheets you already have in your classroom toolbox.
If you’ve been wondering how resource creators make all those digital products so quickly, you’ll be happy to know that making a simple digital resource is not only pretty simple, but it is quick, and if you are creating for students who will view the resources on Chromebooks or through a Google platform (like Google Classroom), then you can adapt and share the resource all in less than 30 minutes.
Just follow the steps below. I’ve included some images to help you along!
Step-by-Step Guide: How to Digitize Worksheets
Step #1: Find the pdf that you want to ‘digitize!’
Find something printable or something in pdf form that you want to be able to assign and completed in a Google platform.
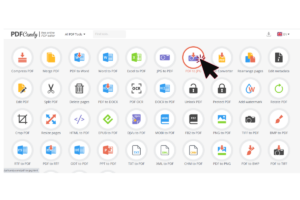
Step #2: Open PDF Candy
Once you have entered the PDF Candy website, you will have many, many, many options for what kind of action you want to take. For our purposes, you will choose PDF to JPG (see the image). When prompted, drop the PDF into the box. Then let PDF Candy do their thing!
 Step #3: Download the JPG
Once PDF Candy converts the PDF to a JPG file, you will have the option to ‘Download’ the JPG, which you will want to download either onto your computer, into your Google Docs, or into Dropbox. We change the PDF to a JPG to secure the image and make sure that once it is added to the background of our slides, students can’t move or adjust any elements on it.
Step #4: Open Google Slides
Once your file has been converted to a JPG, open up a new Google Slides presentation. You will want to begin by deleting any title or subtitle boxes so you are beginning the process with a clean slide. This is important as we don’t want any ‘hidden’ text boxes confusing students while they work.
 Step #5: Add the image to the slide
 Step #5: Add the image to the slide
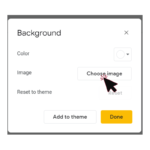
Now that you are looking at a blank slide click on Background.’ If you can’t find it, the button should be under ‘Add-ons,’ but if you don’t see it, you can also click on ‘Slide’ and then ‘Change Background.’
Once you see the pop-up, click on ‘Change Image’ and select or drag in the image you just downloaded. Once you’ve selected the image, the picture will fill the background, but you’ll notice that the image is stretched awkwardly.
Step #6: Change the Slide Size
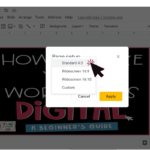
At this point, we will need to change the size of the slide so the worksheet looks correct. By clicking on ‘File,’ and then going down to ‘Page Setup,’ you will get a pop-up that looks like the one below. You will change the page setup from ‘Widescreen 16:9’ to ‘Standard 4:3.’ Now, your worksheet will look much more like the original.
Step #7: Add Textboxes
Now that the image is saved as the background, you are able to add text boxes to the document where you want students to be able to add text.
To create a textbox, click on the little box with a ‘T’ in it at the top of your screen. Then create a textbox on the page to match the size of the space the students have to write. Make sure to test the font, font color, and size of the text for each textbox as some students will not adjust those settings themselves, and you’ll want to make sure the default allows enough space for the student to complete the assignment.
Step #8: Add Any Necessary or Helpful Shapes/Images.
Does your worksheet require students to choose answers? Create ‘highlighting strips’ for students to drag over their choices by creating a rectangle from the ‘Shape’ icon in the menu.
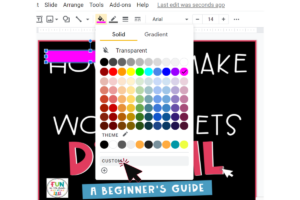
Use the ‘fill’ feature (the small paint bucket icon) to fill in the shape with color. Once you’ve chosen your desired color, click on the ‘fill’ feature again and click on ‘custom’ then adjust the transparency by adjusting the transparency slider in the pop-up.
If your worksheet requires students to choose or identify items, create the number of boxes you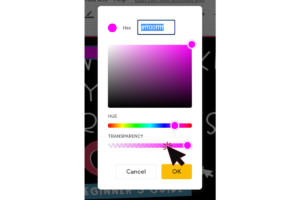 will need by simply copying the transparent rectangle and pasting the desired number of rectangles students will need to complete the worksheet. Note: I suggest stacking them all up on top of each other to keep the document looking clean before sharing it with students.
Step #9: Beef it up!
If you want to add even more options for students, consider using Google to search for some free clipart images that students can drag in and use in the worksheet. (Example: adding base 10 blocks)
To add images to your worksheet, simply find the image (make sure to obey all copyright laws!). For our purposes, we will be looking for png files. Then download the image to your computer, and once you are back in your Google slides, you can select ‘insert image.’ Choose the png you previously downloaded and add it to the worksheet for your students to manipulate.
I hope you found this tutorial post helpful. Try it out with some of the worksheets and pdfs you have hidden away in your files, and let me know how it goes!